Search This Blog

Surfe.be - Banner advertising service

Register your Citycell number in Twitter


Click here for SignUp or SignIn: www.twitter.com


Now, we can register our Citycell number in Twitter and upload a message to share with our Twitter friends through all types of Citycell Handset model by SMS.

To register you Citycell number in you Twitter ID, follow the below statements of sending SMS from your handset.


First SMS] Send SMS from your Citycell Handset, by writing start and send to 9594.


Second SMS] Now, you will receive a SMS as Welcome to Twitter! Reply w/SIGNUP to begin. Already on Twitter? Reply with your USERNAME. (Std msg rates apply. Reply w/HELP for more.) 

Now reply the SMS, you received, by writing your Twitter ID example sroyit and send to 9594.


Third SMS] you will receive a SMS as Hi, @sroyit. Reply w/ Your password to register this phone to your Twitter account. (Password is case sensitive Phone may capitalize the 1st letter) 

Now reply the SMS, you received, by writing your Twitter Password and send to 9594.


Forth SMS] you will receive a SMS as Your password is correct! Reply w/ OK to confirm you want to use Twitter with this phone.


After receiving the SMS, reply by writing Ok and send to 9594.


Fifth SMS] you will receive a SMS as You're all set up to use Twitter with this phone and we've sent your Tweet. Reply w/ TIPS to see what you can do with Twitter.


Now write a SMS as TIPS and send to 9594.


Reply SMS will be as Create a Tweet: just send it to this number. or, type FOLLOW username you'll see their Tweets on your phone. ex: FOLLOW TWITTER More at support.twitter.com


Now, write any SMS and send to 9594, which will be displayed on Twitter wall.

Example, write SMS as "First time send message to Twitter from Mobile" and send to 9594.


Service Features

Reply

Show your Tweet as a reply directed at another person, and causes your twitter to save in their "replies" tab.

Type: @username + message
Example: @samiul_86 I love that song too!


Direct Message
Send a person a private message that goes to their device, and saves in their web archive.

Type: D username + message
Example: D samiul_86 I love that song too!

You can also type M username + message to send a private message
Example: M samiul_86 I love that song too!


Re-Tweet

Send another user's latest Tweet to your followers.

Type: RT Username
Example: RT Samiul_86


 Set Location

Update the location field in your profile.

Type: Set location ‘Place name’
Example: Set location Chittagong


Retrieve Information

Retrieve the profile information for any public user on Twitter.

Type: WHOIS ‘username’
Example: Whois Shafiq Razzaq


Retrieves latest update

Retrieve the latest Twitter update posted by the person.
Type: GET ‘username’
Example: Get Rumi_Ahmed

You can also use G ‘username’ to get a user's latest Tweet.
Example: G Rumi_Ahmed


Mark Favorite

Marks that user's last Tweet as one of your favorites. (Reply to any update with FAV, FAVE, or FAVOURITE to mark it as a favorite if you're receiving it in real time)
Type: Favorite Samiul_86 or Fave Samiul_86 or Fav Samiul_86


Statistics

This command returns your number of followers, how many people you're following, and your bio information.
Type: Stats


Help

Send Text ‘help’, ‘info’, or ‘aide’ to Twitter will bring up helpful tips.
Type: Help


On

Turn all your authorized Twitter updates and notifications on.
Type: On and send to 9594


Off

Turn off all updates except direct messages.

Type: Off and send to 9594
Send STOP again to turn off direct messages too.


All Off

Turn ALL Twitter notifications off.

Type: STOP or QUIT or End or Cancel or Unsubscribe and send to 9594.


On Specific Person

Turn on notifications for a specific person on your phone.

Type: On ‘Username’
Example: ON alissa


Off Specific Person

Turn off notifications for a specific person on your phone.
Type: Off ‘Username’
Example: Off alissa


Follow Specific Person

This command allows you to start following a specific user, as well as receive SMS notifications.
Type: Follow ‘username’
Example: Follow jerry, or F jerry for short.


Leave Specific Username

This command allows you to stop receiving SMS notifications from a specific user.
Type: Leave ‘username’
Example: Leave Samiul_86, or l Samiul_86 for short.


Set a fixed time to receive my mobile alerts

Browse the www.twitter.com and click Profile > Edit your profile> Mobile and edit the options.


Modem Not Detecting due to Port Speed in Windows

Is the data transfer rate set too high?
If your data transfer rate is set too high, your modem may not be able to connect to a modem that has a lower data transfer rate, or you may experience problems with your communications program.
To determine whether this is the problem, reset your data transfer rate by lowering your port speed.

To change your port speed
  1. Click Start, and then click Control Panel.
  2. Click Network and Internet Connections, and then click Phone and Modem Options.
  3. On the Modems tab, click your modem, and then click Properties.
  4. Click the Modem tab.
  5. In the list box under Maximum Port Speed, click 9600.

After you lower your port speed, try to use your modem.

Authentication and Protocol Settings for Citycell Dialup Connection

Error/ Reason to Configure
Error Type:  The protocol is not configured / A dial-up connection could not be established/ Username and password wrong


Common Requirement


The necessary information of dialup connection of Citycell are as below,


User Name:       waps
Password:          waps
Dial Number:    #777


Note: To know how to create dialup connection, then click here.


Internet Protocol Settings in Windows 7


Go to Start > Control Panel > Network and Internet and click on Networking and Sharing Center


Click on Change Adapter Settings


Now select the correct dialup connection which is created to get Internet (PPP - Point to Point Protocol) connection and right click on the icon to click Properties of the Dialup connection.

Note: To know how to create dialup connection, then click here.


Here, we will get a option to select the correct modem from multiple modems which will be used to get internet connection.


Here, we can set the rules which will require at the time of dial and at the time of auto re-dial to get internet connection.


Here, select Data encryption as No encryption allowed (server will disconnect if it requires encryption)


Here, we can select the correct protocol. Just do mark “Internet Protocol Version 4 (TCP/IPv4)” which is used to get connection and unmark other protocols, if selected. To edit the other option of the protocol, click Properties button after selection the protocol.


Select Obtain an IP address automatically and Obtain DNS server address automatically. Now, click the Advanced button to configure more.


Internet Protocol Settings in Windows Xp

By default, Windows dial-up networking connections bind the IPX/SPX and TCP/IP protocols to the dial-up adapter. However, most Internet service providers (ISPs) like Citycell requires only TCP/IP, Client for Microsoft Networks, and the dial-up adapter to connect to the Internet.


Turn off any unnecessary protocols. If same problem, then check Control Panel> ISP Name> (Right Click) Properties> Networking> Type of dial-up server I am calling> selected as PPP: Windows 95/98/NT 4/2000, Internet.


If Problem not solved, check whether IP address is selected as dynamically assign an Internet Protocol (IP) address, therefore check,


EYETRACK - Vehicles Tracking System supported by Citycell


Citycell brings EYETRACK- a location based tracking service that allows any individual or corporate house to locate their vehicles with the help of Global Positioning System (GPS). It ensures better security of vehicles against theft and vandalism in major metro areas. With this service, it is also possible to switch off the car engine from a remote location through SMS.


Key features of EYETRACK are as follows:
  • Real time tracking through web
  • Engine on/off through SMS and Support Center 
  • SOS panic button
  • Silent call facility 
  • 24/7 monitoring and reporting 
  • Approximately 300,000 POI (Point of Interest) nationwide
  • Over speed alert
  • Multiple map option 


Login URL of EYETRACK for online:
http://eyetrack.mycitycell.com/


Login Screen of EYETRACK:


Selection of Date and Time to Track:


Location of Vehicle Shown in Google Satellite Map:


Location of Vehicle Shown in Monico Map:


Specific Location Tracking:


Speed/Distance Report Shown in PDF Format:


Location Report  shown in PDF Format:


Engine Stop and Start Report  shown in PDF Format:

Installation of EC122 Modem in Ubuntu (Linux)


Step Start] Please confirm the following packages (with dependences packages) whether installed or not. To check you may executive following commands,
ZoomUltra@Citycell:~$ dpkg -s ppp
ZoomUltra@Citycell:~$ dpkg -s setserial
ZoomUltra@Citycell:~$ dpkg -s wvdial
ZoomUltra@Citycell:~$ dpkg -s wvstreams
ZoomUltra@Citycell:~$ dpkg -s usb-modeswitch

usb-modeswitch: mode switching tool for controlling "flip flop" USB devices. Several new USB devices have their proprietary Windows drivers onboard, especially WAN dongles. When plugged in for the first time, they act like a flash storage and start installing the driver from there. If the driver is already installed, the storage device vanishes and a new device, such as an USB modem, shows up. This is called the "ZeroCD" feature.

On Debian, this is not needed, since the driver is included as a Linux kernel module, such as "usbserial". However, the device still shows up as "usb-storage" by default. usb-modeswitch solves that issue by sending the command which actually performs the switching of the device from "usb-storage" to "usbserial".


Step 1] Plug-in the Huawei EC122 USB modem and open Terminal to execute the following two commands to the whether Huawei EC122 modem is identified by operating system
ZoomUltra@Citycell:~$ lsusb
Bus 003 Device 002: ID 09da:000a A4 Tech Co., Ltd Port Mouse
Bus 003 Device 001: ID 1d6b:0001 Linux Foundation 1.1 root hub
Bus 002 Device 003: ID 12d1:1446 ONDA Communication S.p.A.
Bus 002 Device 001: ID 1d6b:0001 Linux Foundation 1.1 root hub
Bus 001 Device 001: ID 1d6b:0002 Linux Foundation 2.0 root hub


Here we get vendor id (12d1) and product id (1446) of Huawei EC122 modem. However product id as 1446 means that the modem acts as a storage device rather than as a modem.


Step 2] Now, we will edit the configuration file of usb-modeswitch to work Huawei EC122 device as a modem rather than as a storage device.
ZoomUltra@Citycell:~$ sudo gedit /etc/usb_modeswitch.conf
# Huawei EC122
…..
DefaultVendor= 0x12d1
DefaultProduct= 0x1446
……
TargetVendor= 0x12d1
TargetProduct= 0x1001
……
MessageContent="55534243123456780000000000000011060000000000000000000000000000"


Step 3] Execute the following command to make applicable of changes in /etc/usb_modeswitch.conf file
ZoomUltra@Citycell:~$ sudo usb_modeswitch
* usb_modeswitch: tool for controlling "flip flop" mode USB devices
* Version 0.9.5 (C) Josua Dietze 2008
* Works with libusb 0.1.12 and probably other versions
Looking for target devices
No target device found
Looking for default devices
Found default devices (1)
Prepare switching, accessing latest device
Looking for active default driver to detach it
OK, driver found ("usb-storage")
OK, Driver "usb-storage" successfully detached
Setting up communication with device
Trying to send the message
OK, message successfully sent.
-> See /proc/bus/usb/devices (or call lsusb) for changes. Bye


Step 4] Now execute lsusb command again to confirm whether product id changed from 1446 to 1001.
ZoomUltra@Citycell:~$ lsusb
Bus 003 Device 002: ID 09da:000a A4 Tech Co., Ltd Port Mouse
Bus 003 Device 001: ID 1d6b:0001 Linux Foundation 1.1 root hub
Bus 002 Device 004: ID 12d1:1001 ONDA Communication S.p.A.
Bus 002 Device 001: ID 1d6b:0001 Linux Foundation 1.1 root hub
Bus 001 Device 001: ID 1d6b:0002 Linux Foundation 2.0 root hub

Note: if product id not changed then unplug the Huawei EC122 device and re-plug it and execute the command again.


Step 5] Now give parameters to kernel for identification of the modem and to do this use the following command
ZoomUltra@Citycell:~$ sudo modprobe usbserial vendor=0x12d1 product=0x1001


Step 6] Execute wvdialconf command to modify the file, /etc/wvdial.conf on the basis of Huawei EC122 modem identified by kernel.
ZoomUltra@Citycell:~$ sudo wvdialconf
Editing `/etc/wvdial.conf'.
Scanning your serial ports for a modem.
….........................
…..........................
ttyUSB0<*1>: ATQ0 V1 E1 -- OK
ttyUSB0<*1>: ATQ0 V1 E1 Z -- OK
ttyUSB0<*1>: ATQ0 V1 E1 S0=0 -- OK
ttyUSB0<*1>: ATQ0 V1 E1 S0=0 &C1 -- OK
ttyUSB0<*1>: ATQ0 V1 E1 S0=0 &C1 &D2 -- OK
ttyUSB0<*1>: ATQ0 V1 E1 S0=0 &C1 &D2 +FCLASS=0 -- OK
ttyUSB0<*1>: Modem Identifier: ATI -- Manufacturer: QUALCOMM INCORPORATED
ttyUSB0<*1>: Speed 9600: AT -- OK
ttyUSB0<*1>: Max speed is 9600; that should be safe.
ttyUSB0<*1>: ATQ0 V1 E1 S0=0 &C1 &D2 +FCLASS=0 -- OK
…............................
Found a modem on /dev/ttyUSB0.
Modem configuration written to /etc/wvdial.conf.

ttyUSB0: Speed 9600; init "ATQ0 V1 E1 S0=0 &C1 &D2 +FCLASS=0"


Step 6] Before execute the final command we have to modify the /etc/wvdial.conf file to set phone number, user name and password based on ISP requirement
ZoomUltra@Citycell:~$ sudo gedit /etc/wvdial.conf
[Dialer citycell]
Init2 = ATQ0 V1 E1 S0=0 &C1 &D2 +FCLASS=0
Modem Type = Analog Modem
Phone = #777
ISDN = 0
Username = waps
Init1 = ATZ
Password = waps
Modem = /dev/ttyUSB0
Baud = 9600


Step End] Execute the wvdail command to get Citycell Ultra Zoom connection
ZoomUltra@Citycell:~$ sudo wvdial citycell
--> WvDial: Internet dialer version 1.60
--> Cannot get information for serial port.
--> Initializing modem.
--> Sending: ATZ
OK
--> Sending: ATQ0 V1 E1 S0=0 &C1 &D2 +FCLASS=0
ATQ0 V1 E1 S0=0 &C1 &D2 +FCLASS=0
OK
--> Modem initialized.
--> Sending: ATDT#777
--> Waiting for carrier.
ATDT#777
CONNECT
--> Carrier detected. Waiting for prompt.
~[7f]}#@!}!} } }=}!}$}%\}"}&} } } } }#}%B#}%}%}&hk#>}'}"}(}" !~
--> PPP negotiation detected.
--> Starting pppd at Fri Dec 3 23:01:31 2010
--> Pid of pppd: 1647
--> Using interface ppp0
--> pppd: ���[08]���[08]
--> local IP address 10.1.63.194
--> pppd: ���[08]���[08]
--> remote IP address 2.2.2.2
--> pppd: ���[08]���[08]
--> primary DNS address 117.18.224.146
--> pppd: ���[08]���[08]
--> secondary DNS address 117.18.224.147
--> pppd: ���[08]���[08]


To disconnect the Modem, just press Ctrl+C


Note: The following commands need to executive if security purpose unable to run the pppd called by wvdail in normal user mode rather than administration.
ZoomUltra@Citycell:~$ ls -l /usr/sbin/pppd
-rwsr-xr-- 1 root dip 273312 2010-03-07 09:59 /usr/sbin/pppd
ZoomUltra@Citycell:~$ sudo chmod o+x /usr/sbin/pppd
ZoomUltra@Citycell:~$ ls -l /usr/sbin/pppd
-rwsr-xr-x 1 root dip 273312 2010-03-07 09:59 /usr/sbin/pppd


Note: To check IP addresses and connection related other information then execute the following command
ZoomUltra@Citycell:~$ ifconfig
ppp0 Link encap:Point-to-Point Protocol
inet addr:10.1.105.59 P-t-P:2.2.2.2 Mask:255.255.255.255
UP POINTOPOINT RUNNING NOARP MULTICAST MTU:1500 Metric:1
RX packets:4 errors:1 dropped:0 overruns:0 frame:0
TX packets:5 errors:0 dropped:0 overruns:0 carrier:0
collisions:0 txqueuelen:3
RX bytes:64 (64.0 B) TX bytes:97 (97.0 B)


Note: in case of new version (Version 1.1.0 (C) Josua Dietze 2010) of USB modeswitch then check and edit the file by following below picture,


or execute the below command,

root@localhost:~# sudo gedit /etc/usb_modeswitch.d/12d1\:1446 


ZTE AC682 Modem Installation in MAC Operating System


Follow the following steps to install ZTE A682 modem in MAC operating system,


Stage 1]  When we insert the modem in USB port, a CD-ROM will appear named as Zoom.


Stage 2]  Now, we need to click the file, Zoom Modem Driver Installer 1.00.


Stage 3] Click the Continue button.


Stage 4] When you click the Close Button, the “Zoom“ CDROM will disappear from desktop, this means AC682 device has switched to modem mode


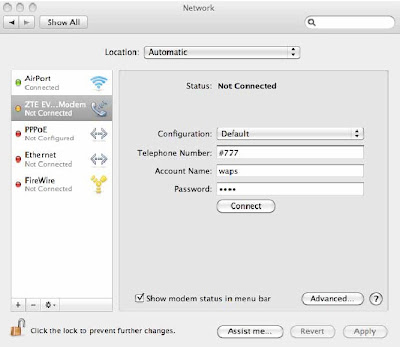
Stage 5] Now click the system preference > Network, then we will get the following dialog box,


Stage 5] You can find “ZTE EVDO Modem” in here. Write the telephone number is as #777 and user name and password both is as waps,


Stage 6] Now we have to click the “Advanced” button to configure the Modem and select the
Modem model as ewcdmaModem


Stage 7] Go back to the Network, click the Apply button to apply your change,


Stage 8] Now configuration is finished. You can try to use ZTE EVDO Modem to connect the network. If the connection is succeed, it shows in below picture,


Stage 9] Now you can browse.


Note:  If we have installed the “Zoom! Modem Driver”,we can find “uninstall Zoom! Modem Driver” shortcut in the Application. We can use this tools to uninstall driver of AC682.


Note: ZTE AC682 Modem does not provide any Graphical User Interface (GUI), therefore, the dialer of MAC need to be used to get internet connection. 
Surfe.be - Banner advertising service