Search This Blog

Surfe.be - Banner advertising service

Yahoo Configuring in Outlook

Step 1] Open Outlook and click on Tools> Account Settings


Step 2] Select Microsoft Exchange, POP3, IMAP, or HTTP and click on Next button.


Step 3] Mark Manually configure server settings or additional types and click on Next button.


Step 4] Select Internet E-mail and click Next.


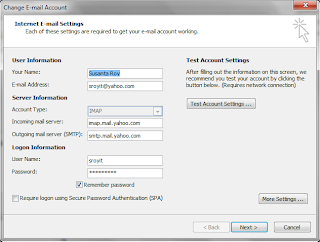
Step 5] In the step, add your account details like email ID, name, password and server information.
Your Name: The name will be displayed as sender
E-mail Address: myemail@yahoo.com
Account type: IMAP
Incoming mail server: imap.mail.yahoo.com
Outgoing mail server (SMTP): smtp.mail.yahoo.com
User Name: myemail
Password: Password that you use to login in Yahoo mail ID.
Authentication required? No, do not put tick mark Require logon using Secure Password Authentication (SPA)

Now click the More Settings button.


Step 6] Open Outgoing Servers. In the tab, select the box against “My outgoing server (SMTP) requires authentication”.


Step 7] Open Advance tab and set the required information and click on Ok button.

Incoming Server (POP3): 993
Use the following type of encrypted connection: SSL
Outgoing Server (SMTP): 465
Use the following type of encrypted connection: SSL


Step 8] Now click the Test Account Settings button to check whether all settings are correct.


Congratulation, all settings are correct and you can receive and send email by using your Hotmail ID.




Hotmail Configuring in Outlook by POP3

Step 1] Open Outlook and click on Tools> Account Settings


Step 2] Select Microsoft Exchange, POP3, IMAP, or HTTP and click on Next button.


Step 3] Mark Manually configure server settings or additional types and click on Next button.


Step 4] Select Internet E-mail and click Next.


Step 5] In the step, add your account details like email ID, name, password and server information.
POP server: pop3.live.com (Port 995)
POP SSL required? Yes
User name: Your Windows Live ID, for example yourname@hotmail.com
Password: The password you usually use to sign in to Hotmail or Windows Live
SMTP server: smtp.live.com (Port 25 or 587)
Authentication required? Yes (this matches your POP username and password)
TLS/SSL required? Yes
Now click the More Settings button.


Step 6] Open Outgoing Servers. In the tab, select the box against “My outgoing server (SMTP) requires authentication”. 


Step 7] Open Advance tab and set the required information and click on Ok button.


Step 8] Now click the Test Account Settings button to check whether all settings are correct.


Congratulation, all settings are correct and you can receive and send email by using your Hotmail ID.


Prepaid Zoom Ultra Activation Process


Prepaid Number Activation and Recharging Process

To activate any prepaid number, you need to recharge a scratch card first.

Dial *887*Hidden Number of Scratch Card

After then you can etopup you account from any nearest Citycell Retailer shop where you will see the below simple.


Prepaid Account Balance Query

Dial *811 from your modem and listen the voice


Prepaid Zoom Ultra Activate Process

Choose an Ultra plan among the plans are being offered, example, ultra1, ultra2, etc.

If you want to activate Ultra1, then, Write sms as ultra1 and send to 9666


Reply SMS: “Dear Customer, thank you for your request for Zoom Ultra activation. Your Zoom Ultra service will be activated within 24 hours. Dial 121 for support.”


You will get a confirmation message after few minutes.


Prepaid Data Balance Query

Write usage and send sms to 811


Reply SMS: “As on 15/07/2011 16:22:59, your zoom usage is: 0.20 MB. Your Zoom package is valid till 01/08/2011 00:00:00”


Prepaid Plan Migration Process


Before activate new plan, just deactivate previous plan by sms

Write zoom off and send to 9666


Reply SMS: “Dear Customer, thank you for your deactivation request. You will receive confirmation SMS within 24 hours. To avoid charging, please do not log in before 24 hours”

After getting confirmation of deactivation, send another sms to activate your desired Ultra plan.

Example, write ultra2 and send to 9666


Modem Interface


Troubleshooting


If you get a error message like that remote connection was denied because the user name and password is not recognized, the check the below conditions,
·         Prepaid account has Zero balance. Check by dialing *811
·         Data validity is over. Check by sending sms as usage and send to 811
·         Prepaid account has no enough balance to deduct the monthly bundle fee of Ultra plan for next month. Check by dialing *811
·         Check the setting that whether user name and password set as waps and dial number is #777.


Authentication Information to Create a Dialup Connection


Dial number: #777
User Name: waps
Password: waps


Alcatel OT-802C and Alcatel OT-356C Configuration


Setting up Yahoo Mail Account (OT802C)

Select Messages—》Email—》Settings—》Email Account,then press left soft key and input right information:

Account Name:Input your name or other information
My Address: Input your email account, for example:alcatelfly@yahoo.com
Use Signature:Input your name or other information
Save Copy:Select Yes or No
User Name: Automatically created
Enter Password:Input your yahoo email password
Receive Server:imap.mail.yahoo.com
Send Server: smtp.mail.yahoo.com
Receive Port: 993
Send Port:465
Auth.Type: IMAP4
SMTP Authentication: Yes
Use SSL: Yes
Data Account: Select WEB or WAP


Setting up Gmail Account (OT802C)

Select Messages—》Email—》Settings—》Email Account,then press left soft key and input right information:

Account Name:Input your name or other information
My Address: Input your email account, for example:alcatelfly@gmail.com
Use Signature:Input your name or other information
Save Copy:Select Yes or No
User Name:   Automatically created
Enter Password:Input your Gmail password
Receive Server:pop.gmail.com
Send Server: smtp.gmail.com
Receive Port: 995
Send Port:465
Auth.Type: POP3
SMTP Authentication: Yes
Use SSL: Yes
Data Account: Select WEB or WAP


Step By Step Guide For Music Storage (OT802C)


  •  Connect handset to computer with supplied cable.
  •  Select “Udisk” mode in the phone, 
  •  Two virtual disks will appear in the PC.
  •  Open any one of the virtual disks (Phone / Memory Card)—》 Audio—》 music.
  •  Copy music files to the music folder.
  •  Stop “Udisk”  mode.
  •  Select “Media player” and press soft “left key” to choose “Update Music library”. 
  •  Open “All songs” menu, and find the music files. 
  •  Play your desired music files. 
  • Do not connect phone to computer.
  • Select “My stuff—》Tone (Phone or Memory Card)—》Music”. 
  • Copy music files to the “Music folder”. 
  • Open “All songs” menu to find the music files. 
  • Play your desired music file. 


Step By Step Guide For Music Storage (OT356C)


  •  Connect your handset to computer with supplied cable. 
  •  Select phone’s menu “Settings—》Gallery—》Udisk”, you will find a virtual disk in the PC.
  •  Open the virtual disk to find the music folder.
  •  Copy mp3 files to the music folder. 
  •  Stop Udisk mode. 
  •  Select phone’s menu “Music player” to play MP3 files.


Note: Alcatel OT-356C supports mp3 format up to bit rate of 320 Kbps.
Surfe.be - Banner advertising service